


Cave Photography

I tend to like the orange red glow of incandescent lighting, and taking pictures without a flash emphasizes my personal memory of the experience. While using a flash yields better sharpness, it also changes the lighting to something other than what you remembered seeing. However, it does show the true nature of the rock which tends to be browns and tans. Flash is nice if you're wanting to study the geological formations, but not as nice if you're wanting the feel of that memory.
1. Come Prepared
Make sure you have a crisp-just-recharged battery or even two. These batteries take a beating in darkly lit areas - whether it's to power a flash or to power the sensor that's being exposed for hundreds of times longer than usual. Also put the largest, fastest card you've got in your camera. In those dark caverns, fumbling around with your cards is a quick way to get them lost! You don't want to open up your camera unless you really have to. What lens you use is up to you. I used a moderately slow zoom lens which took me from 3.4 to around 5. The 50mm f/1.8 might have been better, but many of those formations are so far out of reach that to close in on them you must zoom. Switching lenses during the tour increases your risk of dropping one.
2. Expect Grain
Push your ISO to the highest setting your camera allows and disable the flash unit if you have one built in. Even if you wanted to use a lower ISO, the long exposure time will create artificial grain and distortion on digital sensors so you're going to get grain one way or another. Also expect a shallow depth of field. Push your lens to as fast as it can go by opening up to as wide an aperture as your lens allows. (Make that little f-number as low as it can get.)
3. Set To Burst
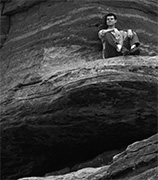
Set your camera to take a flow of shots instead of just one while you press the shutter button. In this setting, when you take a picture (remember to be perfectly still) hold down the shutter instead of just pressing it to take two or three shots of the exact same thing. This gives you a greater chance of capturing shots like the one you see here (this was the middle shot from a stream of three).
Camera shake isn't as severely noticed in long exposures, but hand-holding a camera means it's shots will be based on your overall stability on those slippery floors. The general rule is anything longer than 1/60 of a second should be on a tripod. Of the four different caves I've gone to, you couldn't bring those in unless you have special permission. Somehow the flow of shots or burst shooting helps improve these odds.
4. Be Polite And Trail Behind
Our guide was rather miffed at anyone who wanted to stick around to admire the view. I think she was paid by the inverse of the hour by the comments she made and the way she wanted to cattle the fifty of us through so quickly. That's another thing. These are usually large tour groups. Most people want to pay their $20 to walk through a cave quickly, learn a couple of things then spend another $20 on a T-Shirt that says they did it. They're not interested in sticking around for an hour to fully appreciate the actual geological formations. What does this mean to you as the photographer? Stay at the end of the group.
In fact, I was so far back that the tour group behind us was just a few feet away - these tours were in 15 minute intervals. I wouldn't suggest this if you were in the last tour of the day. Zoiks! Getting locked in one of these caves with all the lights out would be terrifying!
5. Seek Sensible Stability
If there's a handrail nearby, lean on it with as much of your body as you can, and I mean squat down to the point that your arms, side and back are resting firmly on it. However, don't lean on the walls. Let me say that again ... DO NOT lean on the walls. You can be terribly fined for destroying the cave "life" by doing so.
We emit oils and acids that create a water barrier on these stones. That means the water won't settle on these spots anymore to deposit the minerals that keep these formations "alive". I think the fine here was around $15,000!
6. Protect Your Assets
Did I mention slippery floors? That camera strap better be around your neck. I usually have a small padded camera bag that fits around my shoulder at just the right height for the camera to rest in between shots while it's still strapped to my neck. That way if I fall on my camera, it's protected. I forgot that case on this visit, but it's still good advice.
7. Remember Variety
Take pictures of formations up close and far back. The popcorn photo shows so much detail because I was zoomed into it and only 18 inches from it. Those things are small. Formations often look different looking back. Look up. Look down. Look behind you. Each of these are often missed photo opportunities and in most caves you'll notice differentiations in the lighting that could make wonderfully appealing shots that would otherwise be missed.
8. Be Liberal With Your Photography
Be patient and take lots of pictures and at the highest resolution your camera allows. Out of about 200 pictures, only 20 of them came out with a decent level of sharpness. That's only a 10% success rate. Some great formations could be discerned from the multiple identical shots of them, but not appreciated because of their blurriness.
9. Last words of wisdom? Hmmm...
Deep in the cave where the wind doesn't blow, it's hot. Dress cool. Wear good tennis shoes.
If I were to do this again, it would be by myself instead of with a family of kids and relatives. It's an inconvenience to them. I'd warn the tour guide that I'm a shutterbug so I lag behind, then offer a small tip - like $5 or $10 in advance. In American Indian tours, they usually take a $20 - but a good Indian guide is easily worth that ... some of the great shots in my Antelope Canyon trip were a direct result of advice from the guide! I would also ask the manager what types of accommodations could be made or if there were any special photography tours.
10. Final Words and Thanks
My mother in law was very gracious in buying our tickets. It was an expense she didn't need to take, but it also created some great memories with the kids that they'll talk about for years to come. I wanted to take some good pictures for the challenge and so that years down the road they could see them and recall that first whiff of cool cave air when they were still young.
Labels: cave, cavern, guide, how to, low light, natural bridge caverns, photography, tips, tips and tricks
Posted by Bri | Permalink |
Comments (0)
![]()